There is a hair spray-salt rust effect painting method that I have seen demonstrated a few times on the web in a few places. I decide to give it a try. If you don't know what this method is, in short it is painting a model rust, spraying it with hair spray (yep) and covering areas with rough salt. You then paint over the whole mess with a top coat color. Then you soak it in water and brush off the salt which breaks through the top coat, leaving holes to the base coat (rust). Then just some detail work and sealant.
I found about eight older plastic toy cars for ten cents each at a yard sale. They are not really any scale, but they are close enough for 28mm. While not very detailed, nor any particular real world design, I figured they would make decent empty husks of cars, useful for cover and not much else.
To try out the painting method, I am just going to do one car, the others will follow (and show up on battlefields!) as I get a chance to get them done.
 |
| Starting out |
The car is molded in a softer plastic, but still pretty strong. It's a very bright green, and has a few molded details (door handles, door lines, engine grill, etc.) but no interior whatsoever. The wheels are actually pretty strong, and are a good size. I'm going to add those to the bits box.
 |
| Removal of some parts, basic undercoating |
First, I removed the wheels, they came off very easy. The rear window was solid, so I cut it out. that was a bit more difficult, as the rear axle supports ran up to the window. Luckily, this is going to be a wreck, so it getting hacked out and it looking a bit rough is fine. The body is ready, and I start undercoating black, I focus a bit more on the inside getting it coated.
 |
| Rusty undercoating |
After the black, I add a red oxide (rust) and a terracotta spray coating. The terracotta gives a nice orange look over the red oxide, like an active rust. The idea is to get a decent coverage for the rust to show through later. Next I get some hairspray (its just a cheap small can, donated by my wife) and some salt. I am using a mix of table salt and sea salt. The sea salt is larger and rougher pieces, but I hope to get some interesting effects from the smaller salt as well.
 |
| Salting the car |
 |
| A salty snack! |
So several other people have posted videos and guides, they warn about too much salt and also too little. I figure I am going to go for too much to start - this is supposed to be a hulk. I don't think it can look too rusty and nasty. I try and get a couple of areas of just the table salt and the coarse sea salt separated. I want to see what the different salts give for effects.
Watch your eyes - the topcoat is next!
 |
| POW! Yellow! |
Sorry couldn't resist, I used a gloss yellow and the camera flash made it...glow. Here's a couple toned down shots:
 |
| Yellow over the salt and rust |
 |
| Side view |
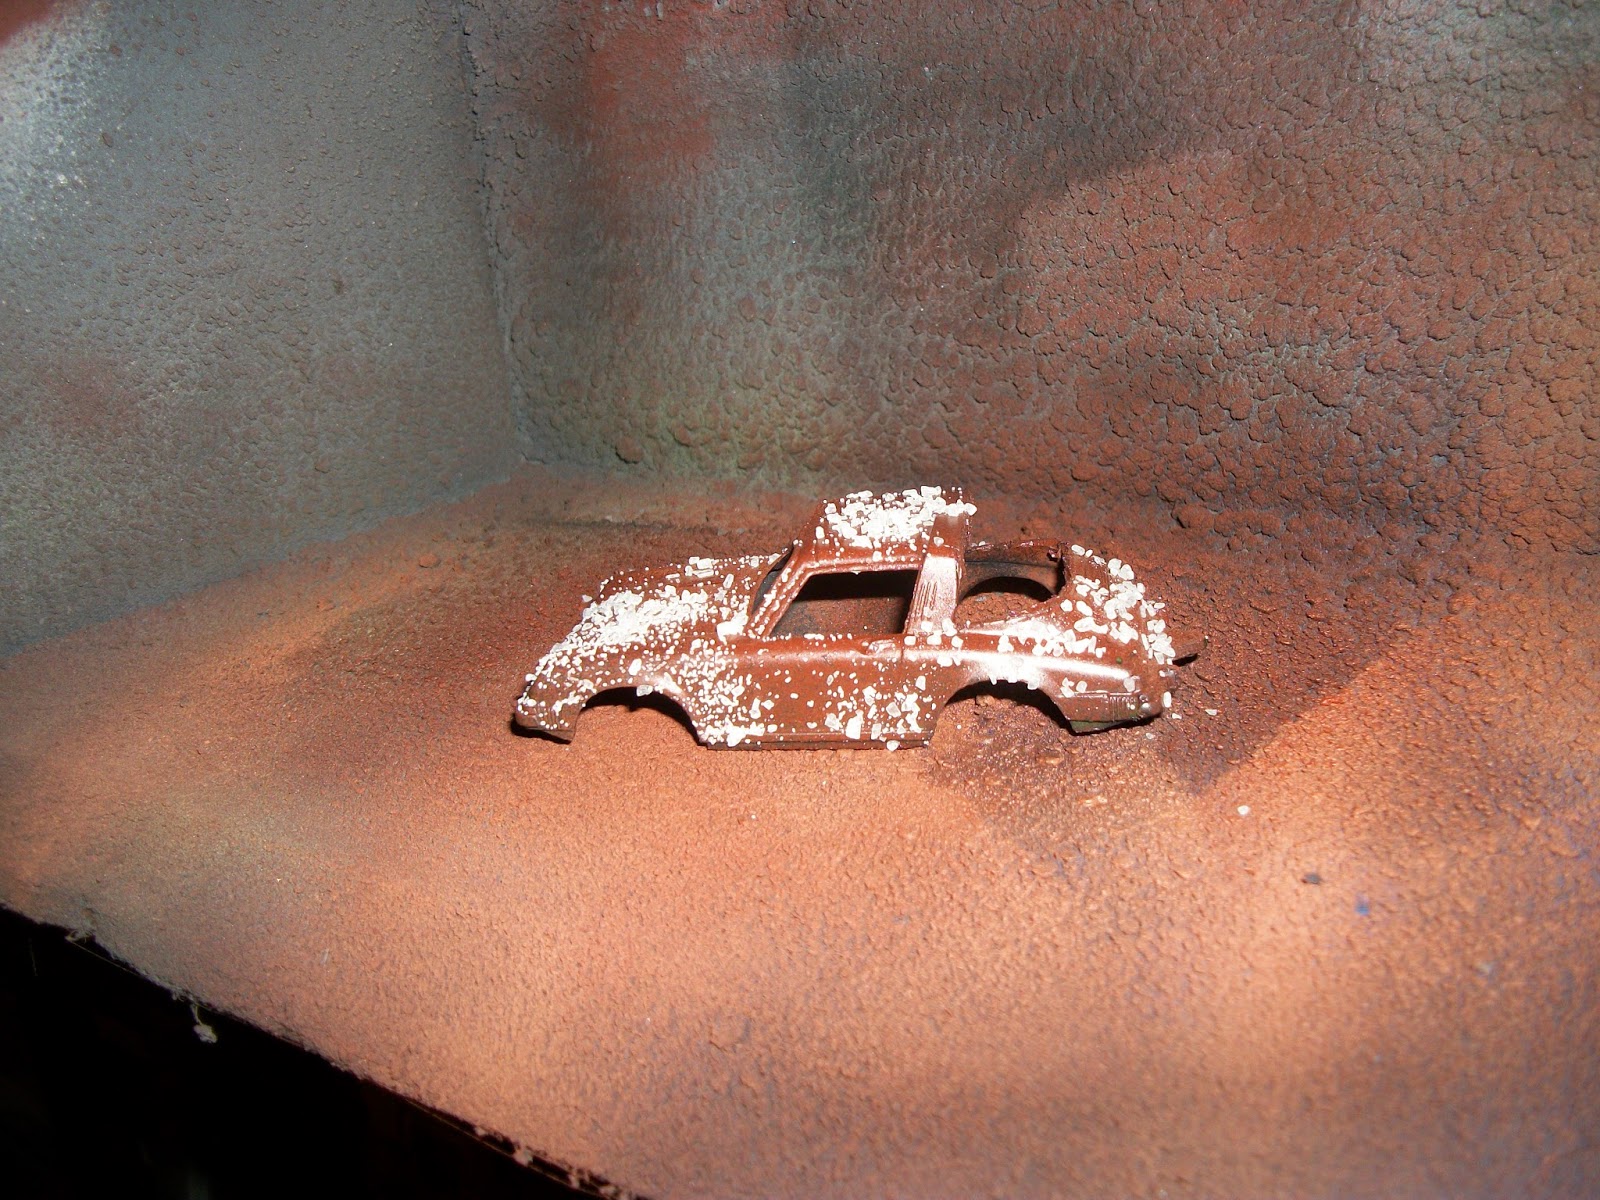
After the topcoat was dry (I left it alone for 24 hours or so) I dunked the body in warm water. I found out it was actually buoyant, so I switched from a tray to a drinking glass (disposable) so I could keep it submerged. I used a pretty nasty old brush to knock off the salt as the water worked to dissolve the salt. I didn't realize how much of a mess it would be, but luckily it was mostly water that made it a mess.
If you try this, be aggressive when you knock loose the salt, BUT, be careful as you can scratch right through the base coat rust color if you are to heavy. I had a few spots that I went all the way through, but I figured I could cover those up easily enough.
 |
| After the wash and brush cleaning |
 |
| Some touch ups but it looks pretty rusty |
Overall, I was pretty happy with the result. The car is still too good looking for a rusty hulk, so I add a black and brown wash (very similar to my zombie wash) to dull the paint and bring out details.
 |
| The wash darkened it a touch |
In the end, this is a decent effect, and I like it. I am going to try it on the remaining cars I have, I will go a bit heavier on some of them, or at least in certain areas much heavier. My goal is just some rusty looking wreckage, which this definitely looks like.
In comparison, I have the new wreck next to the VW bug wreck I did recently. The bug is paint over the existing paint job, not the salt method. They both look like wrecks, just different.
 |
| Two wrecks |
 |
| Wreckage |
This method does not save any time for rust effects. It does give some pretty interesting paint effects, as the paint is really peeling away from the model, it gives a feel of rust showing through. I think it is better used on models that are more 'active' such as tanks and cars that still in use. I could see applying the salt and then a finished coat, then using the salt to reveal rust, that would be a very cool and dramatic look. If I can dig out a model to try it on I'll post some pics of what I mean.
Comments and suggestions are always welcome!


Great looking wreck and at 10 cents each you couldn't go wrong.
ReplyDeleteThe two types of salt really gives a more natural effect to the rust and the wash really sets it off.
I am pretty happy with the results. We'll see if the others look as decent when they are done. The washes at the end did help quite a bit!
DeleteIt certainly looks very good. Did you try to direct the rust onto specific areas such as wheel arches and the edges of doors? Or isn't there enough control to achieve such effects?
ReplyDeleteThe real question is about the hairspray, though. Scented or unscented :-) ?
I did try to direct the salt for rust into certain areas, and I was able to get salt into the areas I wanted. However, even after the water and brushing, they didn't peel away quite as much as I wanted. I am going to go with more salt to try and get the rust more concentrated.
DeleteHmmm...it smelled, but I believe the scent was mid century industrial. Does that count as a scent?
Very clever and a great effect.
ReplyDeleteThanks, for a first attempt, I was pretty happy with the result.
DeleteIt's a great effect, but I can't help wondering if it's worth the extra effort.
ReplyDeleteIt seems like extra work, but I think for a batch of cars, it may be pretty quick. I'm going to try a set of 3-4 next and see how that works.
DeleteAt least it gives a different look for what could be a pretty basic chunk of scenery.
Looks good Steve! Makes an unsuitable toy into a nice piece of scenery.
ReplyDeleteLooks fab I must have a play at some point.
ReplyDelete